The control software is the interface used to drive the router. It runs on Windows-based computers, and has very low computer requirements. Note this interface currently drives only servo-based routers. For information on control software for stepper-based systems, see the software manual page and look for the Steppermotor-based systems section.
Important features
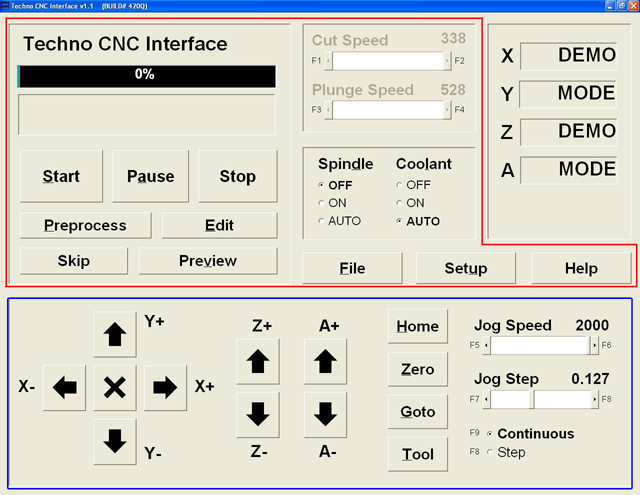
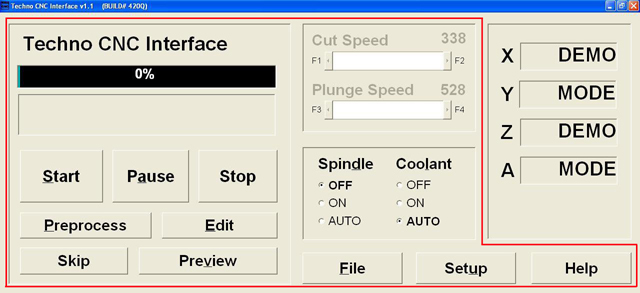
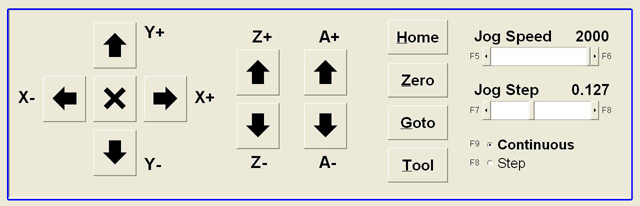
The Techno CNC Interface Main has two primary area through which all the controls are used: JOGGING and FILE EXECUTION. Jogging the machine is synonymous with moving the machine’s axes. All of the Main Menu’s jogging functions either actively jog the machine or set up parameters and controls to jog the machine. In the lower portion of the Main Menu (shown above) are the jogging controls. Also, see the Position Counters in the top right quadrant of the Main Menu. These counters give a constant numerical position of where you jog any axis. The following page will provide a brief overview of the jogging functions. File execution refers to the retrieval, manipulation and actual running of a G-Code file. In this Main Menu you can: view the file’s toolpath, edit code, set speeds and parameters and start-pause and-resume a program run. The upper portion of the Main Menu allows you do perform all these tasks and more. The Main Menu’s upper right quadrant displays the Interface’s Positional Display. This function is useful in both Jogging and File Execution operations. While jogging, you can track the distance of travel for your axes, and while running a file, the Positional Display shows the actual travel of the axes in motion. File executionIn any File Execution, the first step is to retrieve a file. The File button opens a window that allows you to search your PC to retrieve and open a file.
Once you have your file, if you want to edit the code, click the Edit button. If you want to Preview the file’s toolpath, use the Preview button. And before you can even use the Start, Pause or Stop functions, the file must always be Preprocess-ed. Notice how the Progress Bar displays the status of the preprocess function (in a completion percentage) as well as the percentage and current GCode commands of a file being run. The Cut & Plunge Speed scroll bars are file execution parameters. Use them to adjust the speed at which the axes (X, Y = Cut; Z = Plunge) travel during a cutting command. The Spindle & Coolant radio buttons are another set of controls for file execution. Use these controls according to your program requirements. The Setup button brings up the Setup Window with its bookmarked submenu display screen. From here you can set file execution parameters ranging from Feedrates to Scale factors. Jogging
Notice the square buttons with the black arrows. Each of those buttons will move an axis in the direction designated by the letter and value adjacent to it (i.e. Y+). If the Continuous radio button is selected, you can hold down a jog button and the axis will move ‘continually’. If you have Step selected, the axis will only move one step-size at a time. The Jog Step scroll bar sets the incremental distance. The Jog Speed scroll bar sets the speed at which the axes will travel while jogging. Notice the Positional Display Counters during jogging. The travel values will go into negative numbers as well as positive numbers. The A-axis represents the availability for a fourth axis. The column of four buttons (Home, Zero, Goto, and Tool) all allow you to perform shortcut operations. Submenus scroll-out on top of the Main Menu when these buttons are selected.
Positional DisplayThe Main Menu’s upper right quadrant displays the Interface’s Positional Display. This function is useful in both Jogging and File Execution operations. While jogging, you can track the distance of travel for your axes, and while running a file, the Positional Display shows the actual travel of the axes in motion.
|
|||