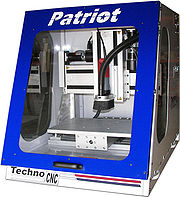
 This document provides information on
how-to setup the Patriot CNC Router. More detailed information is presented in
the Patriot Basic Setup Instructions PDF. All manuals should be
read and understood for proper operation of the machine. This document provides information on
how-to setup the Patriot CNC Router. More detailed information is presented in
the Patriot Basic Setup Instructions PDF. All manuals should be
read and understood for proper operation of the machine.
Warning: READ THIS SETUP
THOROUGHLY BEFORE RUNNING THE MACHINE. HAVE A LICENSED ELECTRICIAN PERFORM ALL
ELECTRICAL CONNECTIONS BASED ON YOUR LOCAL CODES!
See the computer software requirements before purchasing a computer and installing your router.
UNPACKING AND MACHINE IDENTIFICATIONSAll Techno machines are shipped assembled and secured to a wooden pallet. If your machine was shipped disassembled in any way please refer to the Reassembly Instructions provided with your machine. STEP 1: Unpack all items that shipped with your machine. Check the items against the packing slip to be sure nothing was left out. Notify Techno immediately if you are missing any pieces of your shipment. Please note the four lifting handles on the sides of the machine. Also note the four adjustable leveling feet on the underside of the machine.
STEP 2: Using 2-4 people raise the Patriot onto the table top it will be operated on. If you need to adjust the leveling feet follow the steps below. If not continue to the next page. STEP 3: Determine whether or not the table top on which you have the patriot setup on is level, and which side of your machine will needs adjustments. All four leveling feet will be installed before your machine leaves Techno.
Please note the Techno Patriot has a specially designed safety interlocking mechanism to prevent the operation of the machine without the interlock activated, or by use of the teacher’s override key. This key will be zip-tied to the front of your machine. Remove the zip-tie and keep in a safe place. There are two functions of Teacher’s Override Key:
INSTALLING SERVO PCI INTERFACE CARDRefer to computer manufacturer’s manual for the accessibility and location of the PCI Slots. Install the PCI Interface Card before the software. Warning: Ground yourself during
installation.
STEP 1: Turn off and unplug power to your computer. Remove the computers side cover and locate a vacant PCI slot. STEP 2: Remove the vacant PCI slot’s cover plate, and the PCI Interface Card from its protective anti-static packaging. The PCI Interface Card connectors mate with the PC Motherboard in only one way. STEP 3: Gently but firmly insert the PCI Interface Card into the vacant PCI slot. Secure with screw (if applicable), and close the computers side cover. STEP 4: Attach the SCSII Cable connector to the newly installed PCI Interface Card. INSTALLING THE TECHNO CNC INTERFACEWhen you reconnect power, turn your computer on and when Windows starts up it will detect “new hardware.” STEP 1: Follow the Window’s prompts. When asked to “search” for a suitable driver, insert the Techno CD. STEP 2: When asked for “optional search locations” choose your computer’s CD drive. STEP 3: Click on Setup Techno CNC Interface. KEEP THE TECHNO CD IN A SAFE PLACE, IT CONTAINS ADDITIONAL DOCUMENTATION (PDF FILES). SCALE FACTOR INTERFACE SETUPSTEP 1: Start the Techno CNC Interface. STEP 2: From the Main Menu click on the Setup Button, then Systems. The Setup>System screen will appear. STEP 3: Input the numbers printed on the Scale Factor Sticker located on the front leg of the machine. See the circled section in SCREEN CAPTURE 3. Make sure to type the numbers exactly how they appear on the sticker including any negative values. (I.e. -20320) STEP 4: Click the OK Button in the Setup>System screen to save the changes made. Return to the Techno Interface Main Menu. If the values are not written on the front leg of your TECHNO CNC ROUTER then the interface default values should apply. STEP 5: Go to Setup>System>Advanced>Software Switches. Select the check box next to the Patriot. Click OK and continue with the setup instructions below. E-STOP START/STOP BOX INTERFACE SETTINGSThe green button is the START button, hit this button to resume the machine program after having hit the black PAUSE button. The PAUSE button temporarily stops the machine. PUSH THE EMERGENCY STOP (E-STOP) BUTTON WHENEVER YOU NEED TO STOP THE MACHINE IMMEDIATELY. To reset the Start/Stop Box E-Stop, twist the E-Stop button clockwise. The machine will not work if the E-Stop is still pushed in. The settings for the E-Stop Start/Stop Box need to be entered and/or configured in the Techno CNC Interface prior to using the machine. STEP 1: From the Main Menu, go to Setup> Advanced>Touchpad & Remote. Click on the Test Remote Button. Follow the on screen prompts. STEP 2: Press the Start button on your remote E-Stop Start/Stop Box when prompted. Press the Pause button on your remote Start Stop Box when prompted.
|
|