IntroductionThe TechnoCNC RVS1000 control board works with the Control Software to operate a drill bank. There are a set of g-code commands that will extend or retract the individual drill bits, and the length of the bit set will automatically be taken into consideration, allowing multiple length sets of bits in a single drill bank. This document describes how to wire, configure, and set up your drill bank. For information about a particular CAM package, please see the documentation from the company that produces the CAM package you're using. This document does not cover CAM software setup. If you need a post, feel free to call us. If we don't have it, we'll help you get one. This document does contain the required information for creating a post, if necessary. Hardware WiringA serial cable goes from the TechnoCNC RVS1000 control board, to the PC that will control the router. If the PC does not have a serial port, a good quality USB-to-serial adapter can be used instead. Take note of which port is being used, and set it to a low port number (1 or 2) if possible. The RVS1000 board is powered from the control box somehow. The schematics are forthcoming. The drill bank is plugged into the board somehow. Schematics forthcoming. Software SetupServo
Control Software version
1.421
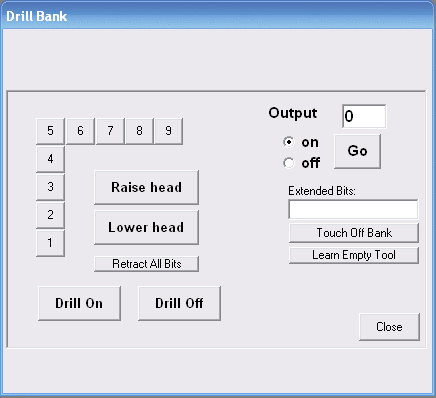
Go to Setup > Advanced > Hardware Switches, and check the box labeled “Drill Bank on COM port”. Enter the serial port number in the box to the right. This is the same port that you plugged the RVS1000 into, in the Hardware Wiring section. Select where your drill bank exists. There are two typical configurations. The most common is mounted to the Z axis, on pneumatics to raise and lower the bank as needed. These pneumatics require air pressure, and it's a good idea to check the Monitor Air Pressure option, just in case. If you're confident in the air pressure, this option is optional. The second option is having it mounted to the A axis. Click the radio button to select this configuration. Click OK to save the Setup. Exit the software and run it again. This ensures all functions know about the changes. When the software appears, you will see a [B] button next to the Coolant and Spindle controls on the main interface. Clicking the button will bring up a dialog box for testing and configuring the drill bank.
If everything is set up correctly, you should be able to click the numbered buttons 1 through 9, to extend or retract individual bits. Extended Bits box displays the bits that are currently extended. If your drill bank is mounted to the Z axis, you'll see Raise and Lower head buttons. These will bring the drill bank up and down, using the pneumatics. Drill On and Drill Off control power to the drill. As expected.
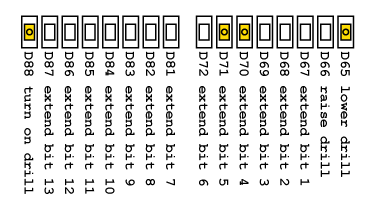
The Output box lets you set individual output bits on the RVS1000 board. This can be used for troubleshooting, by turning on a particular output and watching the corresponding LED light. The LED diagram is detailed in the image below. Note that D65 is output 0 (“lower drill”), and D81 is output 8 (“extend bit 7”). Drill Bit SetupThe process for setting up the bits inside your drill bank is reasonably simple.
Before we do anything, we have to set the bank tools appropriately in the control software. Go to Setup > Tools, and scroll down to the tools labeled Bank 1, Bank 2, etc. Each of these tools represents a bit in the drill bank. For each bit you need to use (typically 1 through 9), enter the number “10” in in the Special column. This tells the software that there is no tool holder for this tool. Click OK when you're finished. Learn Empty ToolLearning an empty tool is only necessary if your drill bank is mounted to the Z axis. If it's mounted to the A axis, you can skip this step. In fact, the button won't even show. If you only have a drill bank on your machine (no spindle or toolchanger), your empty tool will be on the drill bank itself. This is rare, since most machines come with a routing spindle as well as a drill bank. From the main screen, click the [B] button. Click on any of the numbered buttons to extend an empty bit holder. If the empty holder does not drop below any tools in the drill bank, remove the tools. In fact, you should probably just remove all the tools right now, just to be safe. If you have a spindle (you probably do), load up an empty tool in the spindle, and make sure that the bottom of the empty tool extends below any other tools or bits in your drill bank. If not, remove the tools. Place the touchpad on the router table below the empty tool holder, and press the Learn Empty Tool button. The Z-axis will drop slowly, until it touches the touchpad. This stores the Z position of the tip of the empty tool holder. The most important part of this process is to put the touchpad at the same Z height every time you learn a tool length or empty tool position! If you are not consistent, the length of the tools will all be wrong. Teach Bit LengthsPut all your bits in the drill bank, wherever you wish. For example, bits 1 and 2 could be ¾ inch bits that are two inches long. Bits 5, 6, 7, 8 and 9 could be ¼ inch bits that are only one inch long. Bits 1 and two are the first group, and bits 5 through 9 are the second group. Extend the first group of bits by clicking on the 1 and 2 buttons. The only two bits that are extended should be bits 1 and 2. Jog the machine so that bit 1 or 2 (doesn't matter which) is directly over the touchpad, and press Touch Off Bank. The Z-axis (or A-axis) will descend until one of the bits touches the touchpad. The software now knows the length of both bits 1 and 2, and it will store the lengths in the tool table. Click Retract All Bits, and extend the second group of bits by clicking the 5 through 9 buttons. Only bits 5, 6, 7, 8, and 9 should be extended. Position any of the extended bits over the touchpad, and click the Touch Off Bank button. The software now knows the length of bits 5 through 9, and will store these values in the tool table. If you accidentally extend bits 1 and 7 (for example), the software will assume that all bits in the group are the same length as bit 1! If you extend bit 2, 8, and 9, the software will incorrectly believe that all the bits are the length of bit 2 (in our example, 2 inches). Be mindful of this, as it means that accidents can result in drilling through your table surface. Press Close to exit the Drill Bank window. If you go to Setup > Tools and scroll down to the Bank 1 tool number, you'll notice that the Z Length Offsets are now populated with non-zero numbers, indicating that the software knows how long each bit is. Set Bank X and Y Locations (or Master Bit) The “master bit” concept is the most widely used concept in drill bank operation. When you set up your CAM software, you are expected to define the location of all your bits relative to a master bit. This bit can be any of the bits you choose. Just make sure you pick one, and stick to it. The control software needs to know where this master bit is located in X and Y, relative to the spindle. To set the master bit location, every drill bit in the tool table needs the X Offset and Y Offset set to the master bit location. So for example, if you have a 9-bit drill bank, and the X and Y offsets for the master bit are 12.4 inches and 29.2 inches away from the spindle center, you'd write “12.4” under the X Offset column and 29.2 inches under the Y Offset column for Bank 1, Bank 2, … through Bank 9. All banks will have the same offset, because you're using a master bit. There are many other ways to configure bit locations. Some CAM packages allow you to define the master bit offset in the CAM software, so no special X and Y Offset is required (set them to zero, in this case). If you prefer to use the drill bank as a sort-of toolchanger, you could place individual tools in each position of the drill bank, and set the X and Y Offset for each one relative to the spindle. Thus, when extending Bank 3, it'd use the X and Y Offset for that specific bank. This should be a rare setup situation, but it's possible. Just be aware that only one bit should be extended at a time or the settings for the lowest-numbered bit will be used. G-Code CommandsThe commands to operate a drill bank connected to a RVS1000 control board look very similar to the commands used to control IO. Some IO commands have special meaning when connected to a drill bank, and those are listed below. Note that in general, M91 will perform an action, and M90 will reverse the action. So for example, M91OUT102 will extend the first bit, and M90OUT102 will retract the same bit. Bank Control
Extend Bits
Retract Bits
Problems and ErrorsNumbered Buttons Don't Extend BitsIf you can't use the numbered buttons under the [B] window to toggle the drill bits, take note of the error message and try to correct any wiring problems. If you toggle the bits on and off, you should see the corresponding light on the RVS1000 board blinking. The lights turn on when a bit is extended, and turn off when retracted. If the lights are working, but the bank isn't extending the bits, double-check that the drill bank is powered and electrically configured correctly. Light toggling on the board mean the software and board are configured correctly. Serial Timeout when Raise or Lower Head button is pressedIf your drill bank is on the Z axis, you'll see buttons for raising and lowering the head. If you click “Raise head” or “Lower head”, the bank should raise and lower. But there's a catch. The head is mounted with limit switches that detect whether the bank is actually up or down. If your limit switches aren't working properly, you'll get a timeout error after about 3 seconds. On some systems, this error messages pops up under the drill bank window. If this happens, your Drill Bank window will appear to be frozen. Press Esc to dismiss the error and the drill bank window will start working again. If your drill bank doesn't move up within 3 seconds, you'll also get the error. In this case, check the air pressure. There are two lights on the RVS1000 that will toggle back and forth, when these buttons are pressed. They will operate even if the limit switches don't work. If you press the Raise and Lower buttons, and the lights work but the drill bank doesn't move, check for wiring, air pressure, or hardware problems. Message: The toolchanger requires you to manually LOAD tool 116.
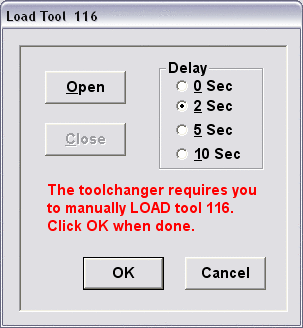
This simply means you haven't set up the bit correctly. Bank 1 corresponds to tool 116. Bank 2 would be 117, and so on. Make sure you have entered "10" under the Special column, to indicate the tool has no stand associated with it. Also make sure the Z Length Offset is non-zero; if it's zero, follow the routine in this document to learn the bit length. |
||||||||||||||||||||||||||||||||||||||||||||||||||||||||||||||||||||||||